Showing posts with label Christmas. Show all posts

Wednesday, December 9, 2015

The Real 12 Days of Christmas


In the 16th century, England proclaimed 
an official state church, 
any other religious teaching was strictly forbidden. 
So, for the next three centuries,
 those who refused to join the state church 
developed creative ways to teach 
their children the truth of the Bible. 
One popular method was lyrics and song.

Discover the 'hidden' symbols in the familiar carol 
'12 Days of Christmas' 
where 'My True Love' refers to God!

Here are slides adapted from Helen Haidles beloved book,
 'The Real 12 Day of Christmas',
One of my favorite books to read to my kids this time of year.


Tuesday, December 16, 2014

Colored Light memory verse game


We came up with a fun way to work on our
memory verse for December Party Club 2014.

I printed out light bulb shapes, 
colored the tops and wrote one word 
of the verse on each bulb in white crayon.
I taped them to a foam core poster board and 
painted a wire running through and a cord.

I have bowls with a small amount of watered 
down craft paint and a piece of sponge in each.

The idea is to have kids rub the paint 
onto the bulb
 to 'magically' uncover a word from our verse.
Then we will recite the verse together. 


I will post a follow-up photo of the painted bulbs.

Here are the printable bulbs:


It was a hit!!

Only problem I had was,
there are only 14 'bulbs' and about 
30 kids that wanted to help 'turn on the lights! 

club photo by Julianna Dunning

We sang:

'and they shall call his name Emmanuel x3
which means God with us!',
to the tune of 'Happy Birthday'.

 So everyone picked up the verse easily.

Behold, a virgin shall be with child, 
and shall bring forth a son, 
and and they shall call his name Emmanuel, 
which being interpreted,  God with us.
 ~Matthew 1:23


Tuesday, December 2, 2014

Celebrating my Saviour Jesus' first advent...

...and eagerly awaiting His second!
 
 
If you see this, I'm praying for you! 
 May you know the great love of Jesus, our Creator!
 He'll be calling up all those trusting in Him soon and He will be King of kings and Lord of lords!

~And if I go and prepare a place for you,
I will come again, and receive you unto myself;
that where I am, there ye may be also.
John 14:3~
 

Monday, December 1, 2014

$ Dollar Stretchin' Holiday Gift and Decor Ideas

I was asked to find a Christmas craft to demonstrate for the ladies at a holiday luncheon.
Since everyone is so different, I decided that maybe 10 crafts would be better. 
The odds of one of them piquing someones interest are greater.
So, with help from Pinterest, here are 10 ideas
 I tried with reasonable success:

1. Dry Erase 'Notepads'
-Remove glass, spray paint frame of a Dollar Store 5x7 frame
-When dry, reassemble frame with a ‘shopping’ or ‘note’ sheet in place of a photo.
-Decorate edges as desired
-Attach a dry erase marker for a simple gift,
can be used in the kitchen for shopping list or by bedside for notes.

2. Personalized Plate or Mug
-Decorate a Dollar Store mug or plate with a Sharpie pen in desired design/pattern.
-Place in a 350 degree oven for 30 minutes to set the ink.

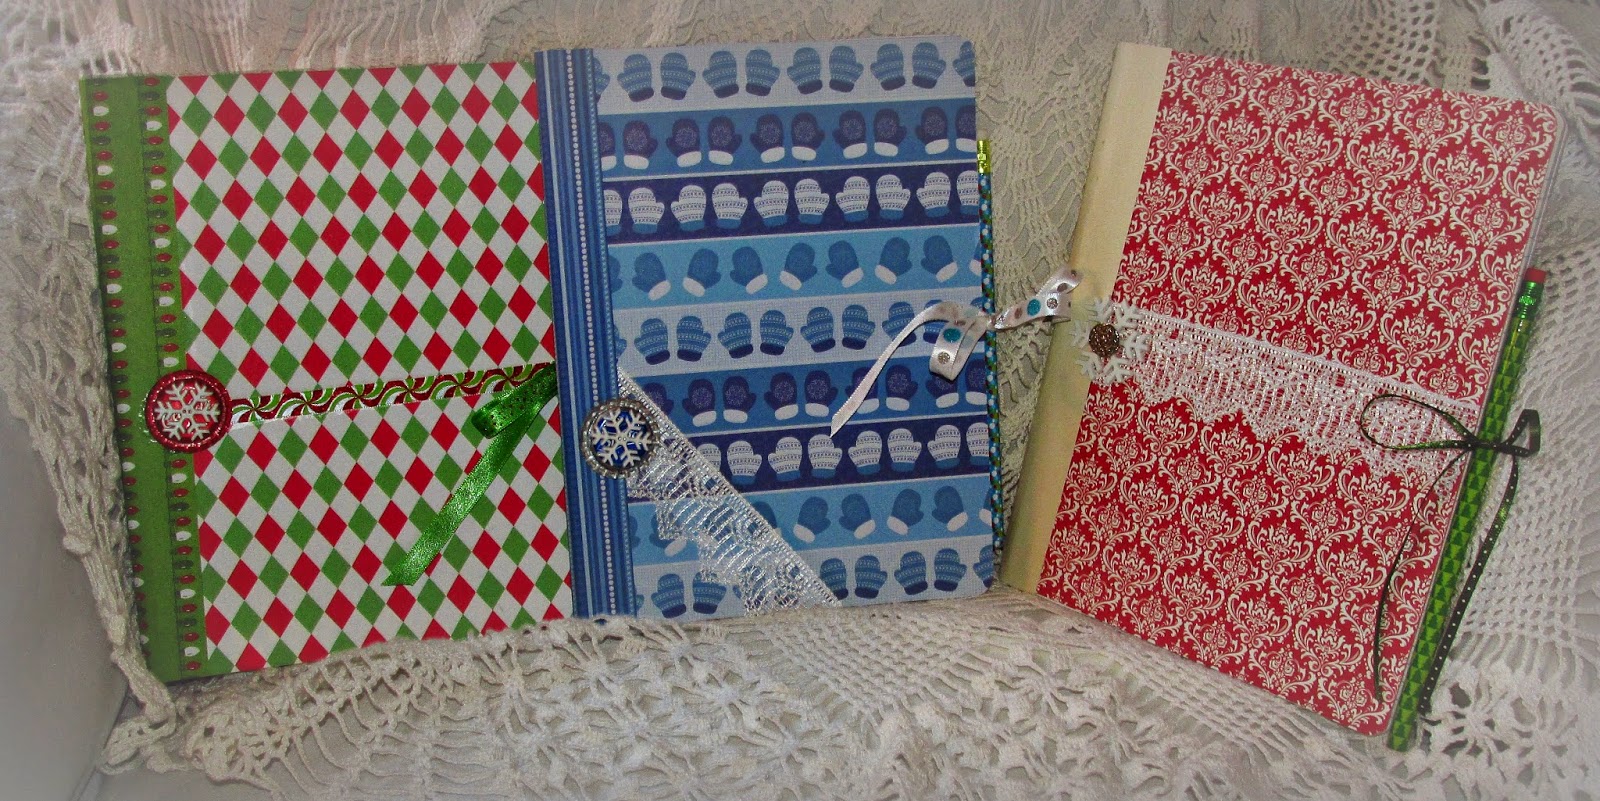
3. Decorated Journals
-Start with an economy composition book
-Using the plain side of pretty scrapbook paper, trace around cover of book, front and back.  Then on inside front and back. Cut out pattern you’ve just traced.
-Glue (stick or school) a complementing ribbon across inside cover front and back for a tie, then cover with the paper you cut. Glue cover on front and back, cut a strip to cover the binding if desired.
-Embellish as desired with lace, buttons, gems etc., using tacky glue or hot glue for best hold.
-Give with a pretty pen or pencil.

4. Button Bookmarks
-Use tacky or hot glue to attach big pretty buttons to super size paper clips

-Cut a small piece of felt or paper to press on the other side of paper clip/button to hold it in place with the glue.

5. Teacup Candles
-With super glue or E6000, adhere a teacup or tea mug to its saucer.

-Affix  a wick to bottom center (double sided foam tape is best)
-Melt and pour hot wax to fill and let set up.  Soy wax is best.
-Tie a pretty ribbon round the base or lay fresh greens and berries around.

6. Circle or Star Paper Ornaments
-Cut out stars or circles. Here are printables for circles and stars or cut your own from festive scrapbook paper.
-fold down center
-Glue or tape 3 or 5 folded stars or 4-6 folded circles
-Thread a cord through center and slide beads on either end.
-Tie a knot on bottom
-Tie a loop on top to hang.

7. Snow Scene Jars
-In any clean, dry jar arrange a bit of faux snow
-Take a small snowy tree (add a little glitter glue if you like) and place in snow
-Drop in tiny cedar cones, bells, other miniature items for your scene

-Wrap ribbon, lace or a strip of burlap to top of jar.
-Spray a little glitter or fake snow as desired.


8. Village Scene Jar
-You will need a good size wide jar with smooth sides, like from pickles
-Use ‘Township Candle Holder’ template and either
  1. cut out scene using black cardtock, wrap around jar or
  2. put template temporarily inside jar and carefully paint 2 coats using acrylic craft paint and a small brush.
-Allow to dry, spray a little fake snow around top of jar.
-Place a real or LED candle inside and enjoy the lovely scene.

9. Gift Tubes

-Cut scrapbook paper or cardstock into 7 x 4 inch rectangles

-Roll each into cylinders and tape seam with scotch tape then cover with washi tape
-Flatten one end of cylinder and seal with scotch then washi tape
-Fill partway with a tiny gift and candy
-Flatten open end the opposite way and tape closed with more scotch then washi tape
-Decorate with stickers if desired.


10. Scrappy Felt Keyfobs
-Cut out 2 felt circles with pinking shears
-Stitch a felt initial applique or buttons to the top piece if desired
-Cut a 2 inch piece of ribbon, fold in half and pin between the circles at the edge with a loop sticking out.
-Stitch around the circle making sure the loop get secure

-Attach a key ring.


Sunday, November 23, 2014

Wordless Book Tree Ornament

I was assigned to come up with a craft for our
Christmas Party Club at Good News Club.
In prayer, I asked God to show me what we should do
 and then did not think of it for a few days.
Then, as I was dropping my girls off for a club in Centralia, 
sweet Patti from the CEF board there showed me this fun craft.
 It is not only cute but has the wordless book colors
so it tells the gospel story.

                                                                                                                                               Thank you to Bob Ward Images for photo

So, with some gold metallic craft stems and felt,
we'll be making some great trees.
You take the stem and make 5 bends to start the star,

 then twist the end down and wrap around
just past the last bend, twist and then shape star.
Cut out felt using
this printable guide.
Order them similar to what is shown.

A couple greens, white, green, red, couple greens, black etc.

Punch hole in center of each square using a hole punch
 with a small punch, not notepaper size.
If you don't have a punch a small thin awl
could be used to bore the stack.


 Here is the star ready for sliding felt pieces on.


Now just slide the stack on!


Finish with a twisted loop so they don't slide off.


And lay the loop flat.


Voila! A fun decoration that tells a story.

Well, here is one kit, just 39 more to make!


And I will have these Wordless Book tracts to go with them.


And Jesus said unto them, 
                                 Go ye into all the world,                                   
and preach the gospel to every creature.
                                           Mark 16:15


Update:
I cut out over 1500 squares and punched holes in each,
stacked 'em and bagged 'em!
If any kids say they don't like the craft they will be
sweeping the gym floor in its entirety! LOL


Post Party Club update:

The kids all loved this craft.
Several wanted to give them to their teachers 
that do not know Jesus.
One boy took an extra so he could make it with 
a young relative to tell her about Jesus.

Precious times!
May God's word go forth unhindered!!

Wednesday, January 15, 2014

Winter Picnic


For our last club meeting of Fall, we had a Winter Picnic. 
It was a sweet time of reading a Christmas book, singing and a picnic with parents.

The invitation:


We read this great book that cuts through some of the myths of Christmas:


The mural I painted to remind us who we celebrate:


And I did not have time to get photos of  all the great food, here is the fun fruit tree: